My Time
The Mobile version of the Time Recording screen (My Time) consists of the following views:
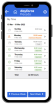
This is the landing page of My Time where you will see records for the week.
Every time an employee lands on this screen, the employee sees the week based on the configuration set on Program Control WVIEW.
- You can view the hours summed to day level in a week (e.g. 8 hours on Sunday, 8 hours on Monday).
- You can view the status summed to day level in a week (e.g. Day Submitted on Sunday, Day Approved on Wednesday).
- You can view the total number of hours logged for the week (e.g. 40 Hours in total).
- You can view the above data for the current, past and future weeks by navigating on this screen, including hours posted to payroll (i.e. status = Posted).
- You can submit the timesheet for the whole week and all unapproved time transactions logged toward the days in the week will be submitted and thus approved by the employee.
- You can re-submit timesheet for the week if managers / payroll officers have changed any time transactions for the week (i.e. status = Employee Approval Required).
- You can drill down from here to the Detail Entry Screen to add a new time transaction for a day if no hours logged for that day so far.
- You can drill down from here to the Day View screen to view hours saved or submitted for that day.

Button
This button takes you back to Preceda Mobile Main screen.
When clicked, records for seven days prior to the Start Date on current week are displayed.
When clicked, records for seven days after the End Date on current week are displayed.
Clicking Submit updates the Employee Approval flag to Y.
This button is hidden when there are no records in the status of Require Employee Approval in the week.
Browselist
This displays the start and finish dates of the week and is based on the configuration of Program Control WVIEW.
This column indicates the status of approval for all hours per day. Refer to the Summary Level section of Time Entry Status Iconography to understand what each icon represents.
This column displays the days in a week, starting from Sunday.
This column displays the date in a week, starting from the date on Sunday.
This column displays the total hours (e.g. 8 Hours), including hours worked and leave if leave recording is enabled via Design Timesheet Templates, logged against a day.
When no hours is logged for the day, 0 hours is displayed.
This displays the corresponding text per icon status.
It is hidden if the day has zero hours recorded.
Clicking this drilldown icon:
- If day total hours is not 0, you will be directed to the Day View.
- If day total hours is 0, you will be directed to the Detail Entry View.
This displays the total hours logged against the days displayed (e.g. 39.5 Hours).
The Day View displays all entries for a particular day. All time segments that exist for the day are shown and can be drilled down.
- A blank (0:00) entry is always displayed to allow new records to be added.
- You can view all time segments logged for the day with a status flagged per segment.
- You can view the total number of hours logged for the day.
- You can submit all hours logged against the day and submission is deemed as employee approval.
- You can re-submit all segments for the day your manager has changed any time transactions against the day.
- You can drill down further by segment to the Detail Entry View to review, or sometimes add, modify or delete the segment.
-
If the day is in a Prior Pay Period, you may have the option to unlock the day for modification if Retro Time and TIMERECLOCK settings allow this.

Button
This button takes you back to the Week View without submitting the time entries for the day.
This button takes you back to the Main screen without submitting the time entries for the day.
Either the button Submit or Unlock My Time becomes available depending on settings.
If Submit is available, clicking Submit, all segments of the day will be recorded as employee approved. The View will be refreshed and will display the new status per segment.
If Unlock My Time is available, clicking it, all posted segments of the day become editable (unlocked) on the Detail Entry View. You may drilldown by each segment and make changes.
Browselist
This displays the Day and Date for the selected day.
This column indicates the status of approval for each segment. Refer to the Individual Level section of Time Entry Status Iconography to understand what each icon represents.
This displays the duration of the time entry in the unit of hours (e.g. 8 Hours, 4.5 Hours) for a segment.
This displays the corresponding text per icon status.
It is hidden if the day has zero hours recorded.
Click this icon to go to Detail Entry View.
This displays the sum of hours logged for the day (e.g. 4.5 Hours).
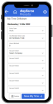
The Detail Entry View is where you can create, modify and delete time entries.
- When Break(minutes) and Break Start are specified here, on Save My Time, you are directed back to the Day View and the hours are automatically split into 2 segments - one before the break started and the other after the break finished.
- The layout and fields available on this view are controlled by Design Timesheet Templates settings.

Button
This button takes you back to the Day View without changing the time segment.
This button takes you back to the Main screen without submitting the time entries for the day.
Clicking this button deletes the segment from the Time Editor records and returns the screen to Day View.
If you are editing after the day is unlocked, deleting all segments for a posted day is not allowed.
- If the day has only one segment previously posted, on deletion, you will be directed back to the Day View and see an error message.
- If the day has more than one segment previously posted, deleting all but the last segment is allowed. However, when you try to delete the last segment for the day, you will be directed back to the Day View and all previously deleted segments will come back (i.e. no segment has been deleted from the day).
Clicking this button saves the segment to the Time Editor records and returns the screen to Day View.
If you are editing after the day is unlocked, changing all segments for a posted day to zero hours is not allowed.
Fields
Based on the settings via Design Timesheet Templates screen and linked to the employee via Group Profile, other fields available on Detail Entry View are different.
This displays the Day and Date for the selected day.
Enter the time you commenced working for the day.
Format is [xx:xx] in 24hr mode.
Enter the time you finished working for the day.
Format is [xx:xx] in 24hr mode.
When logging work hours, specify the duration of your meal break.
When logging work hours, specify the start time of your meal break.
This allows employees to specify whether they are recording hours for work or for leave. It defaults to Work so you do not need to select from the prompt list when recording new hours.
Below field availability is based on the selection of Entry Type (Work or Leave).
Enter the time you commenced working for the day.
Format is [xx:xx] in 24hr mode.
Enter the time you finished working for the day.
Format is [xx:xx] in 24hr mode.
You may specify a break length in minutes (e.g. 30).
When Break has a value other than zero, specify the time you started the break.
Format is [xx:xx] in 24hr mode.
Start Time and Finish Time are editable.
Specify a valid Time Code:
- If a Time Code Filter is selected on Design Timesheet Templates and linked to the employee via Group Profile, then the Time Code must be included in the list of Time Codes selected to be Visible for Leave Recording in this Time Code Filter.
- If no Time Code Filter is selected on Design Timesheet Templates linked to the employee via Group Profile, the Time Code must be included in the database.
It is recommended that employees select from the prompt list to ensure that the Time Code is valid.
Specify the number of hours for the specified Time Code.
If the Start and Finish Times are left blank and only the Hours are entered, the Start Time will default to the Pay Period Rule Definition Start Time.
Specify a valid Time Code:
- If a Time Code Filter is selected on Design Timesheet Templates and linked to the employee via Group Profile, then the Time Code must be included in the list of Time Codes selected to be Visible for Hours Recording in this Time Code Filter.
- If no Time Code Filter is selected on Design Timesheet Templates linked to the employee via Group Profile, the Time Code must be included in the database.
It is recommended that employees select from the prompt list to ensure that the Time Code is valid.
Specify the number of hours for the specified Time Code.
On Save, the Work Hours Recording Start Time will be defaulted to the Start Time of the Pay Period Rule.
This allows employees to specify whether they are recording hours for work or for leave. It defaults to Work so you do not need to select from the prompt list when recording new hours.
Below field availability is based on the selection of Entry Type (Work or Leave).
Specify a valid Time Code:
- If a Time Code Filter is selected on Design Timesheet Templates and linked to the employee via Group Profile, then the Time Code must be included in the list of Time Codes selected to be Visible for Hours Recording in this Time Code Filter.
- If no Time Code Filter is selected on Design Timesheet Templates linked to the employee via Group Profile, the Time Code must be included in the database.
It is recommended that employees select from the prompt list to ensure that the Time Code is valid.
Specify the number of hours for the specified Time Code.
On Save, the Work Hours Recording Start Time will be defaulted to the Start Time of the Pay Period Rule.
Specify a valid Time Code:
- If a Time Code Filter is selected on Design Timesheet Templates and linked to the employee via Group Profile, then the Time Code must be included in the list of Time Codes selected to be Visible for Leave Recording in this Time Code Filter.
- If no Time Code Filter is selected on Design Timesheet Templates linked to the employee via Group Profile, the Time Code must be included in the database.
It is recommended that employees select from the prompt list to ensure that the Time Code is valid.
Specify the number of hours for the specified Time Code.
On Save, the Leave Recording Start Time will be defaulted to the Start Time of the Pay Period Rule.
These fields will be available or hidden depending on whether they are selected to be Visible on Design Timesheet Templates (i.e. their visibility is not controlled by Report by Time, Report by Hours or Enable Leave Reporting setting). The fields are: Daily Rule & Secure Fields 1- 7.
Time Entry Status Iconography
The icons and texts are used in the Day View to indicate the approval status of each segment. They may be used in Week View if all segments for the day are at the same individual level status.
| Status | Icon |
|---|---|
| Draft |

|
| Submitted |  |
| Proposed |

|
| Approved |

|
| Posted |

|
If not all segments in a day are of the same approval status, the icons and texts displayed against a day follow this rule:
- Display the status icon and text for the lowest Status Level found among the segments in a day.
- The icons and texts are listed in below table.
Status Level Individual Level Status Summary Level Icon Status Summary Level Text Status 0 Draft 
Submission Required 1 Submitted 
Partially Approved 0 Proposed Submission Required 2 Approved 
Partially Approved 3 Posted Partially Overridden